In this Article we will go over adding Countdown Timers to Your Pages
The timer item allows you to add countdown timers to your pages. The timers can be set to trigger different actions when the countdown hits zero, like showing a popup, hiding or showing sections of your page, redirecting the user and more. Below we will go over the two different ways to customize your timers, with the 'Page Timer Settings' and the 'Timer Styles.'
You can add timers to your page by adding a 'timer item' to any block, or adding a 'done-for-you' section that includes a timer on to your page.
Action to Take When Timer Expires
Page Timer Settings
All timers on an individual page will 'listen' to the overall Page Timer Settings. Meaning, you can set the timer settings in one place, and every specific timer you add to that page, will use those settings!
NOTE: The timer 'styles' (or design) can be customized for each timer item.
You can access the Page Timer Settings by either clicking on the blue button at the top of the individual 'timer item' settings sidebar, or under the 'Page Settings' tab in the sidebar control panel.
Countdown Options
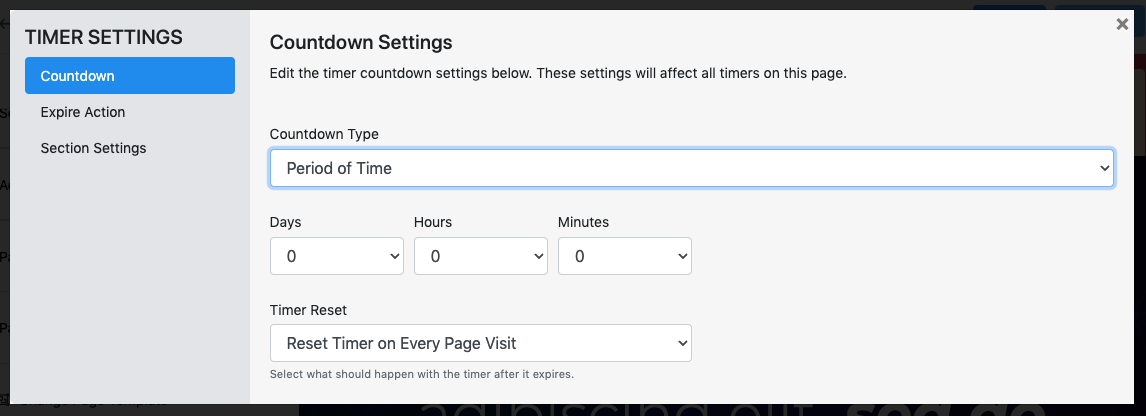
The countdown option allows you to choose what type of timer you want to use. You can choose between a specific date (for example an event or deadline) or a specific period of time (like 30 minutes). Based on your choice here, you will see different options.

Specific Date:
This is pretty simple. Choose the date, time and timezone you want the timer to countdown to
Specific Period of Time:
Select the days, hours and minutes you want to timer to countdown for
-
Timer Reset - Here you get to select what happens when the timer expires:
-
Keep timer expired: This will keep the timer expired indefinitely.
-
Reset timer on every page visit: This will reset the timer on every page visit, even if the user has been there before
-
Keep timer expired for time period: This setting will keep the timer expired for a certain amount of time, but after that amount to time it will reactivate for that user.
-
Timer Reset - Here you get to select what happens when the timer expires:
-
Keep timer expired: This will keep the timer expired indefinitely.
Keep timer expired: This will keep the timer expired indefinitely.
-
Reset timer on every page visit: This will reset the timer on every page visit, even if the user has been there before
Reset timer on every page visit: This will reset the timer on every page visit, even if the user has been there before
-
Keep timer expired for time period: This setting will keep the timer expired for a certain amount of time, but after that amount to time it will reactivate for that user.
Keep timer expired for time period: This setting will keep the timer expired for a certain amount of time, but after that amount to time it will reactivate for that user.
Expire Action
The expire action tells the page what to do after the timer expires. You can choose what will happen on the page when the timer expires, as well as what happens to the display of the timers themselves.
Expire Action
The expire action allows you to choose what will happen on the PAGE when the timer expires. Let's go over the options below
-
Business Center Page: Redirect the user to a specific page in your business center
-
Show Timer Popup: This will trigger the specific 'Timer Popup' on your page which is completely customizable. You can also set this popup to be 'un-closable' so it can potentially hide the page when the timer expires. The timer popup settings can be access from the Sidebar Control Panel. (Note: The timer popup settings will only be available when a countdown option has been set)
-
Go to URL: Redirect the user to a specific external URL
-
Go to Checkout Cart: Redirect the user to a specific checkout cart you've created in your business center
-
Go to Digital Download: Redirect the user to a specific 'digital download' file you uploaded to your business center
Business Center Page: Redirect the user to a specific page in your business center
Show Timer Popup: This will trigger the specific 'Timer Popup' on your page which is completely customizable. You can also set this popup to be 'un-closable' so it can potentially hide the page when the timer expires. The timer popup settings can be access from the Sidebar Control Panel. (Note: The timer popup settings will only be available when a countdown option has been set)
Go to URL: Redirect the user to a specific external URL
Go to Checkout Cart: Redirect the user to a specific checkout cart you've created in your business center
Go to Digital Download: Redirect the user to a specific 'digital download' file you uploaded to your business center
Timer Expire Settings
The 'timer expire settings' will tell the PAGE what to do with the timer item itself. Depending on your expire ACTIONS, this may or may not be important to you. Let's go over these options below:
-
Hide Timer: This will hide the entire timer item
-
Display Message: This will display an optional message in place of the timer. You will be given a limited text editor to create this message if you choose this option
-
Show Elapsed Time: The timer will begin counting UP to show the elapsed time
Hide Timer: This will hide the entire timer item
Display Message: This will display an optional message in place of the timer. You will be given a limited text editor to create this message if you choose this option
Show Elapsed Time: The timer will begin counting UP to show the elapsed time
Section Settings
Section settings allow you to hide or show specific sections on your page when the timer expires. This can be very useful for many reasons. You may want to 'hide' the offer section after a deadline, and 'show' an expired 'wait-list' section. You may want to show an offer after a specific amount of time has been spent on the page. You have 3 options for each section:
-
None - Section will do nothing after the timer expires
-
Hide - Section will be hidden after the timer expires
-
Show - Section will start out hidden and will be shown after the timer expires
None - Section will do nothing after the timer expires
Hide - Section will be hidden after the timer expires
Show - Section will start out hidden and will be shown after the timer expires
Timer Styles
Unlike the page timer settings, Timer Styles can be customized for each timer you have on the page. These settings will customize the actual look and feel of the timer.
Layout
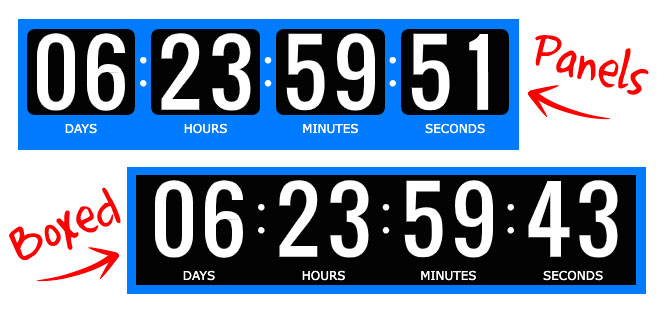
Choose between Boxed and Panel. a 'Boxed' look will add background boxes to each group of numbers, like minutes and seconds. A 'Panel' look will add a background box round the entire timer.

Number Style
This setting allows you to change the font of the timer. Choose between 'condensed' and 'normal.'
Colors
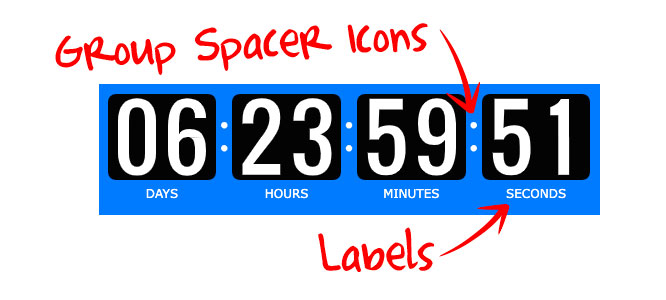
You can change the number color, background box color and the label color (If you choose to show the labels in your timer, you can turn them on, and the words for example Days, Hours, Minutes will show up under their corresponding numbers.)
Max Height
The maximum height of the timer can be set so that, regardless of how big the section or block is, the timer can never be above this maximum height. It's a good way to control how big the timer can be on the various device views.
Group Spacing
Group spacing allows you to control the space between each of the sets of numbers. Increasing the group spacing will make the timer wider overall.
Group Spacer Icon
You can choose to show 'spacer icons' between the groups of numbers to better distinguish between the numbers themselves. You can choose to have them off, or add circle icons to the timer.

Use Number Flip Animation
This option, when turned on, will add a 'flip' style animation that will make the timer look more 3d. This setting is off by default.
Display Settings
The display settings allow you to control when the 'Days' and 'Hours' groups are shown. If left to automatic, they will only be shown when there are days or hours left in the countdown. For example, if there are only 23 hours left in the countdown, the 'Days' group will not be shown, as it would read '00'.
You can set these options to 'Always Hide' or 'Always Show' depending on the look you are going for with your timer.
Did this answer your question?😞😐😃