Learn the process of setting up and mapping a custom domain to your business center for better branding and a more professional look.
DIGITAL MENTORS MEMBERS:
If you would prefer, you can view a video walkthrough course for adding a custom domain in your Business Center Academy here.
Setting up a custom domain to use with your business center is highly recommended as it allows you to maintain a consistent user experience. Custom domains require SSL security via CloudFlare. This ensures the security of your customers' data and keeps your checkout pages compliant.
This article will walk you through the steps to get your domain setup with Cloudflare (free) and how to integrate your new domain with your business center.
Enter your Custom Domain
First, you'll need a domain. If you don't already have one, you'll need to choose one for your business center. You can purchase a domain name from Cloudflare directly (recommended), Google Domains, GoDaddy, Namecheap, or any other domain registrar. If you already have a domain, you will be able to setup a subdomain to use with your business center.
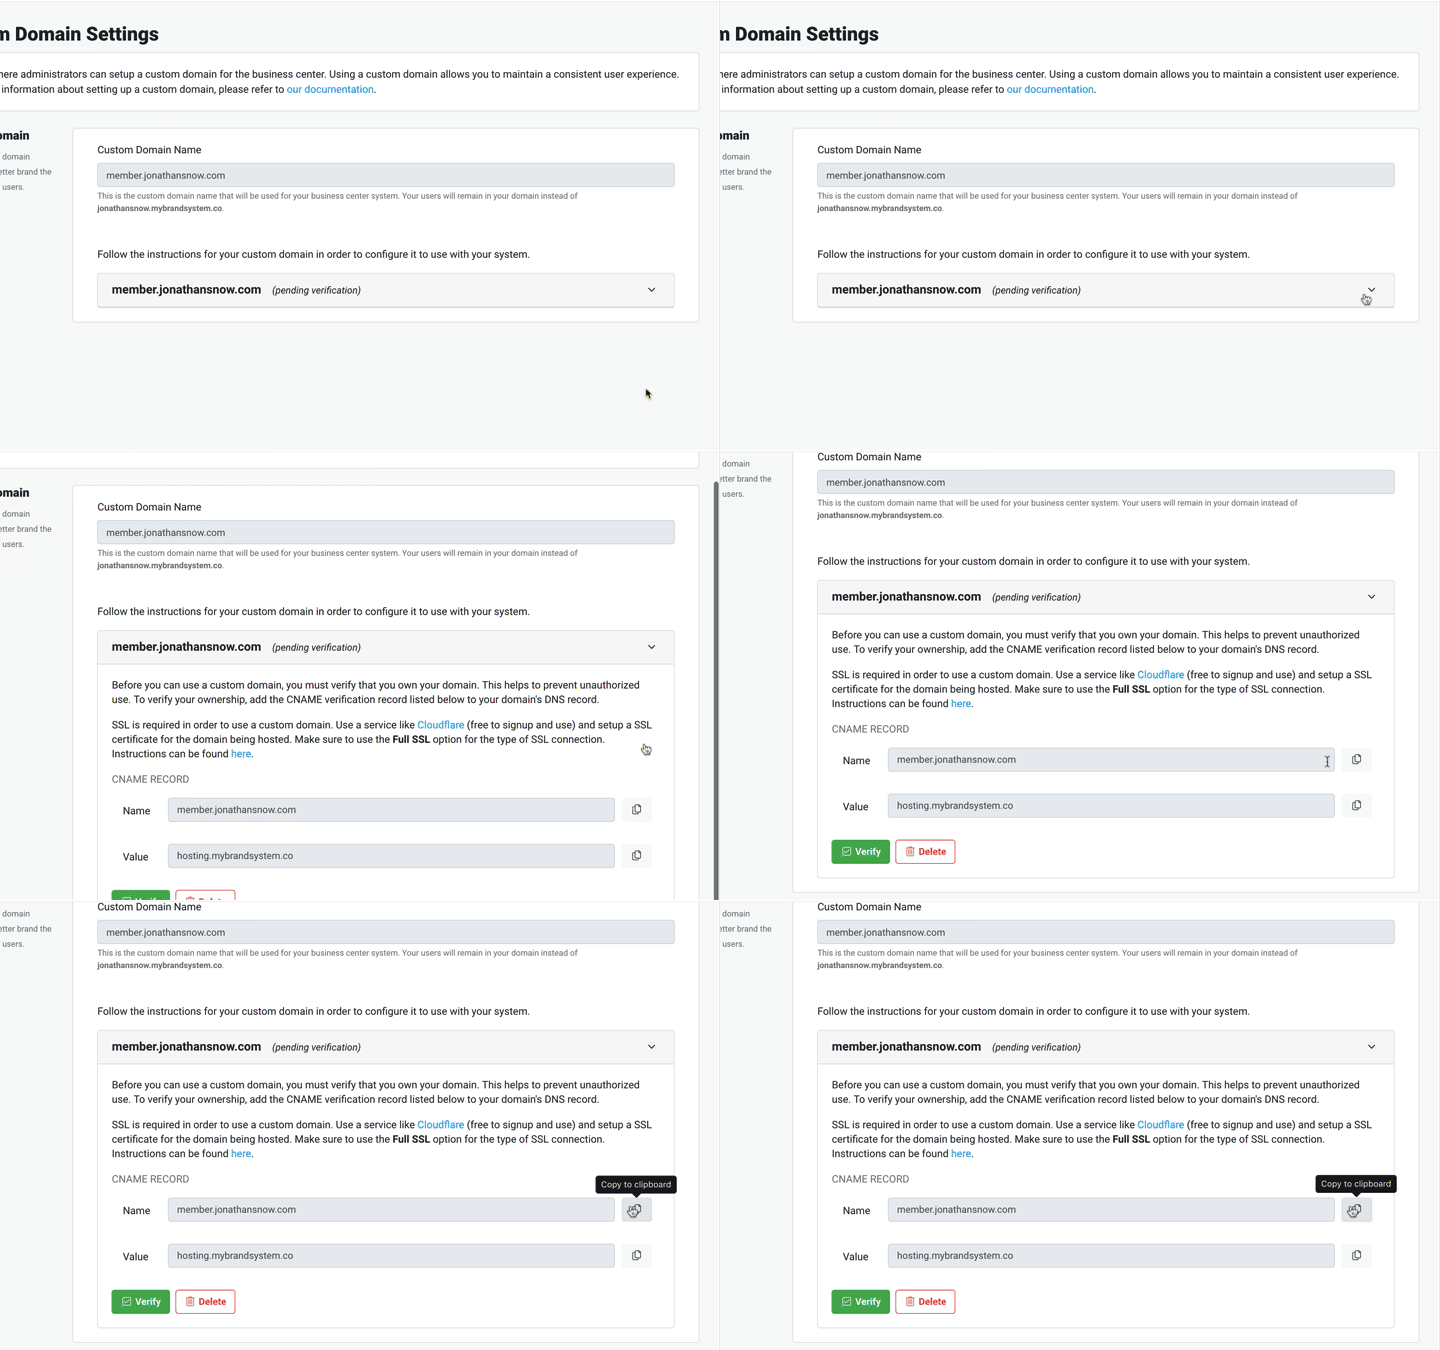
When logged in to your business center dashboard, go to Account Settings -> Custom Domains and enter the domain you plan on using for your business center.
Note - you do NOT need to enter https:// however, a subdomain is required so you will want to use something like 'www' or 'member'
Examples - if my domain was jonathansnow.com
'member.jonathansnow.com'
'courses.jonathansnow.com

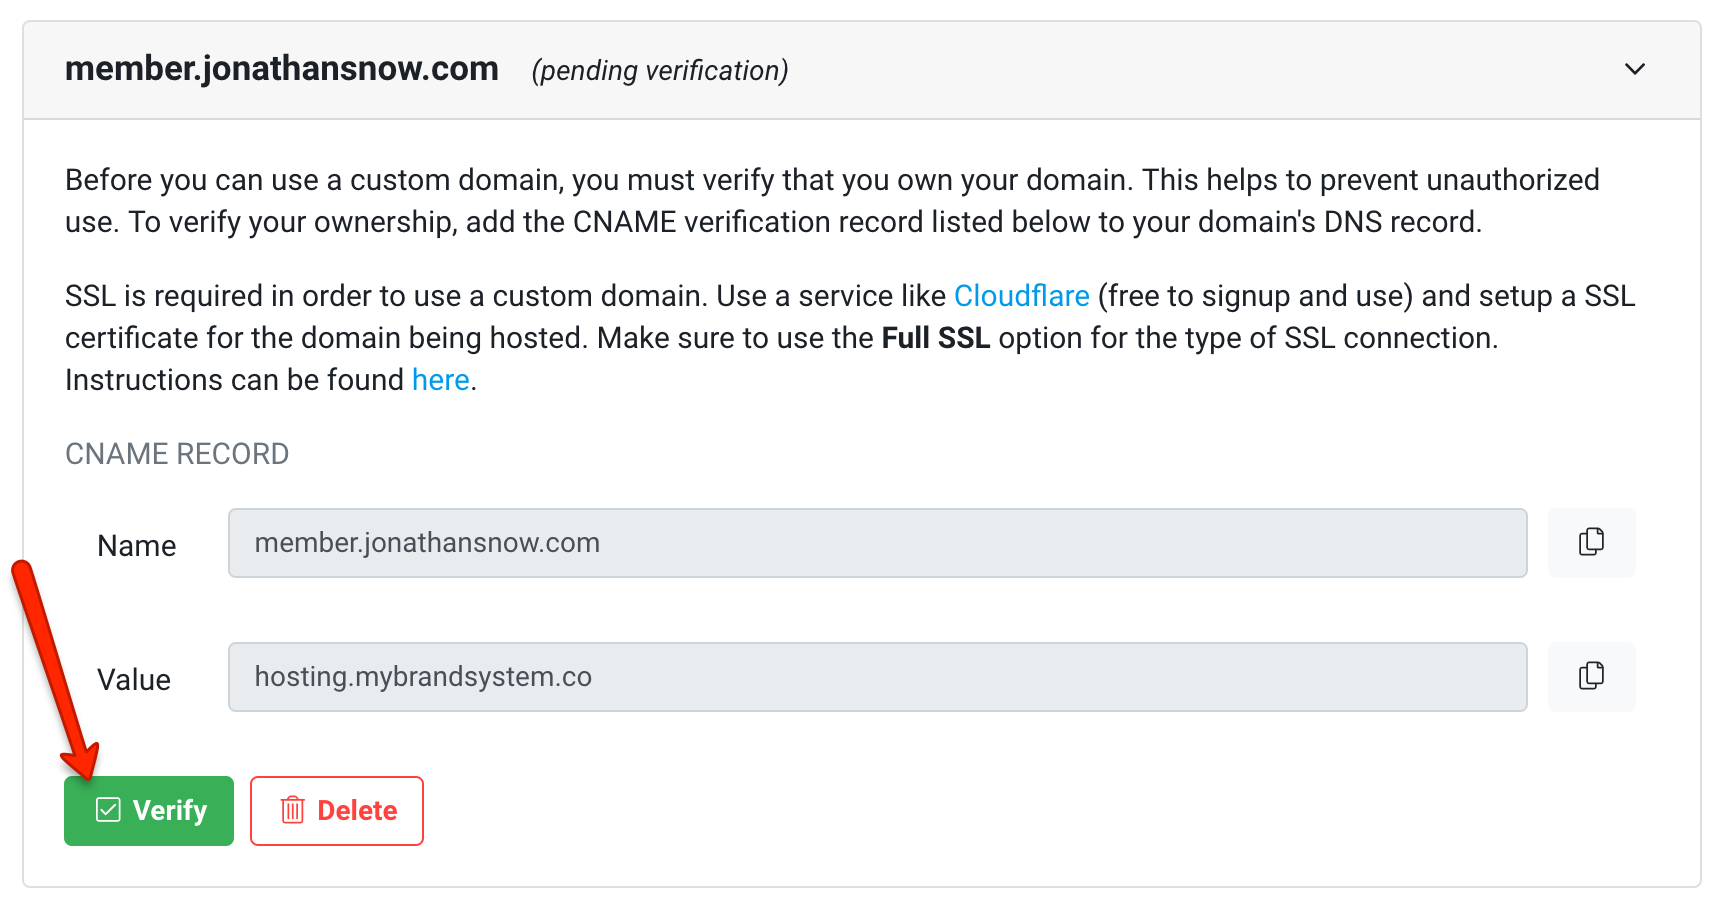
Once you enter the domain you will be using, you will be presented with the instructions on how to complete the setup, which will be covered in the rest of this article. Click down the dropdown to expand the instructions and you'll see some values provided that you will need to complete the setup in cloudflare.
Getting Setup with Cloudflare
NOTE: We recommend you open up cloudflare in a new browser tab so you still have access to the custom domain page.
Once you have your domain that you want to use, it's time to register for a free Cloudflare account.
-
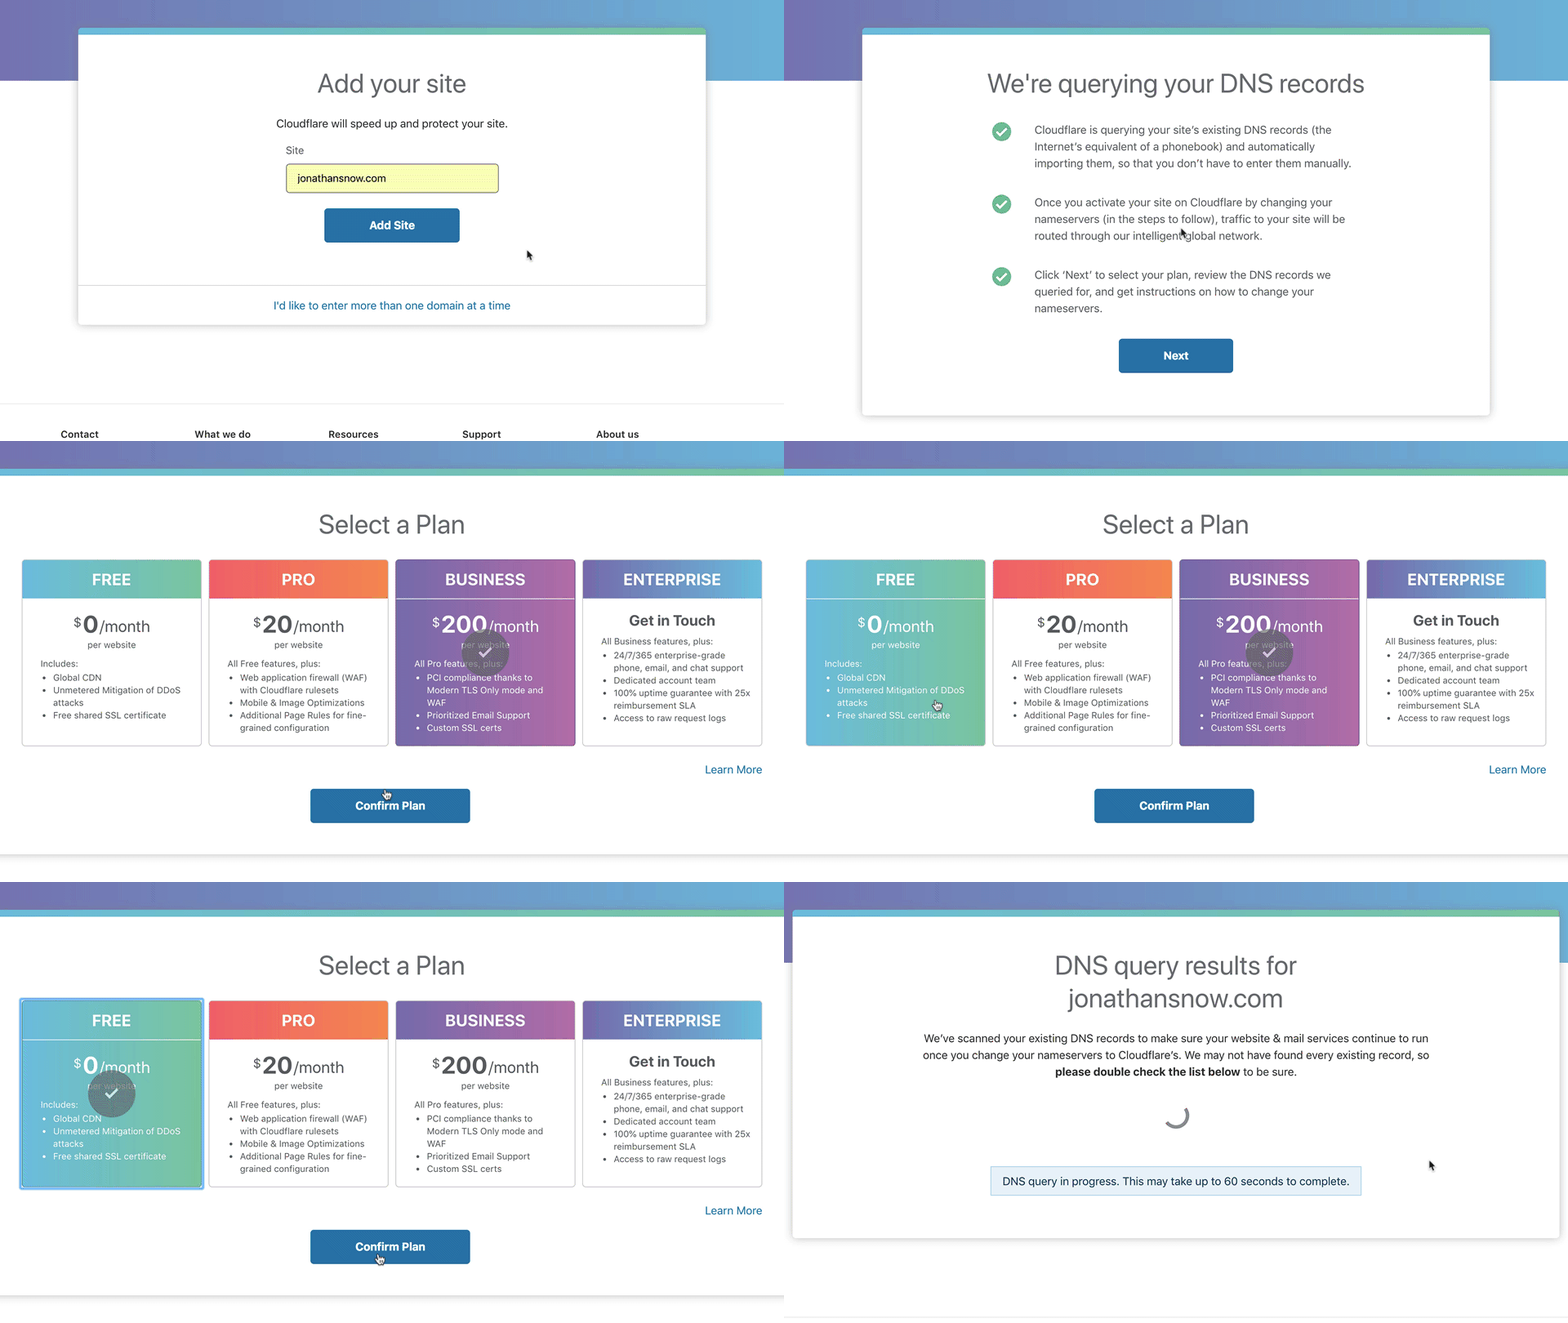
After you are registered, you will be asked to add your site to Cloudflare. Simply type in your domain name in the field shown.
-
Cloudflare will begin querying your domain for all of its existing settings. Just click Next and you will see your account options. For our case, we just need a FREE Cloudflare account. So click on 'free account' and continue.
After you are registered, you will be asked to add your site to Cloudflare. Simply type in your domain name in the field shown.
Cloudflare will begin querying your domain for all of its existing settings. Just click Next and you will see your account options. For our case, we just need a FREE Cloudflare account. So click on 'free account' and continue.
-
Essentially, what we are doing here is making Cloudflare your new domain’s DNS (Domain Name System). Any previous entries you had for your DNS like www.yoursite.com, blog.yoursite.com, etc. will now be brought over and managed in Cloudflare. So, what you will want to do next is make sure the DNS entries brought over from Cloudflare are all correct before adding your new Business Center domain (i.e. member.mysite.com).
-
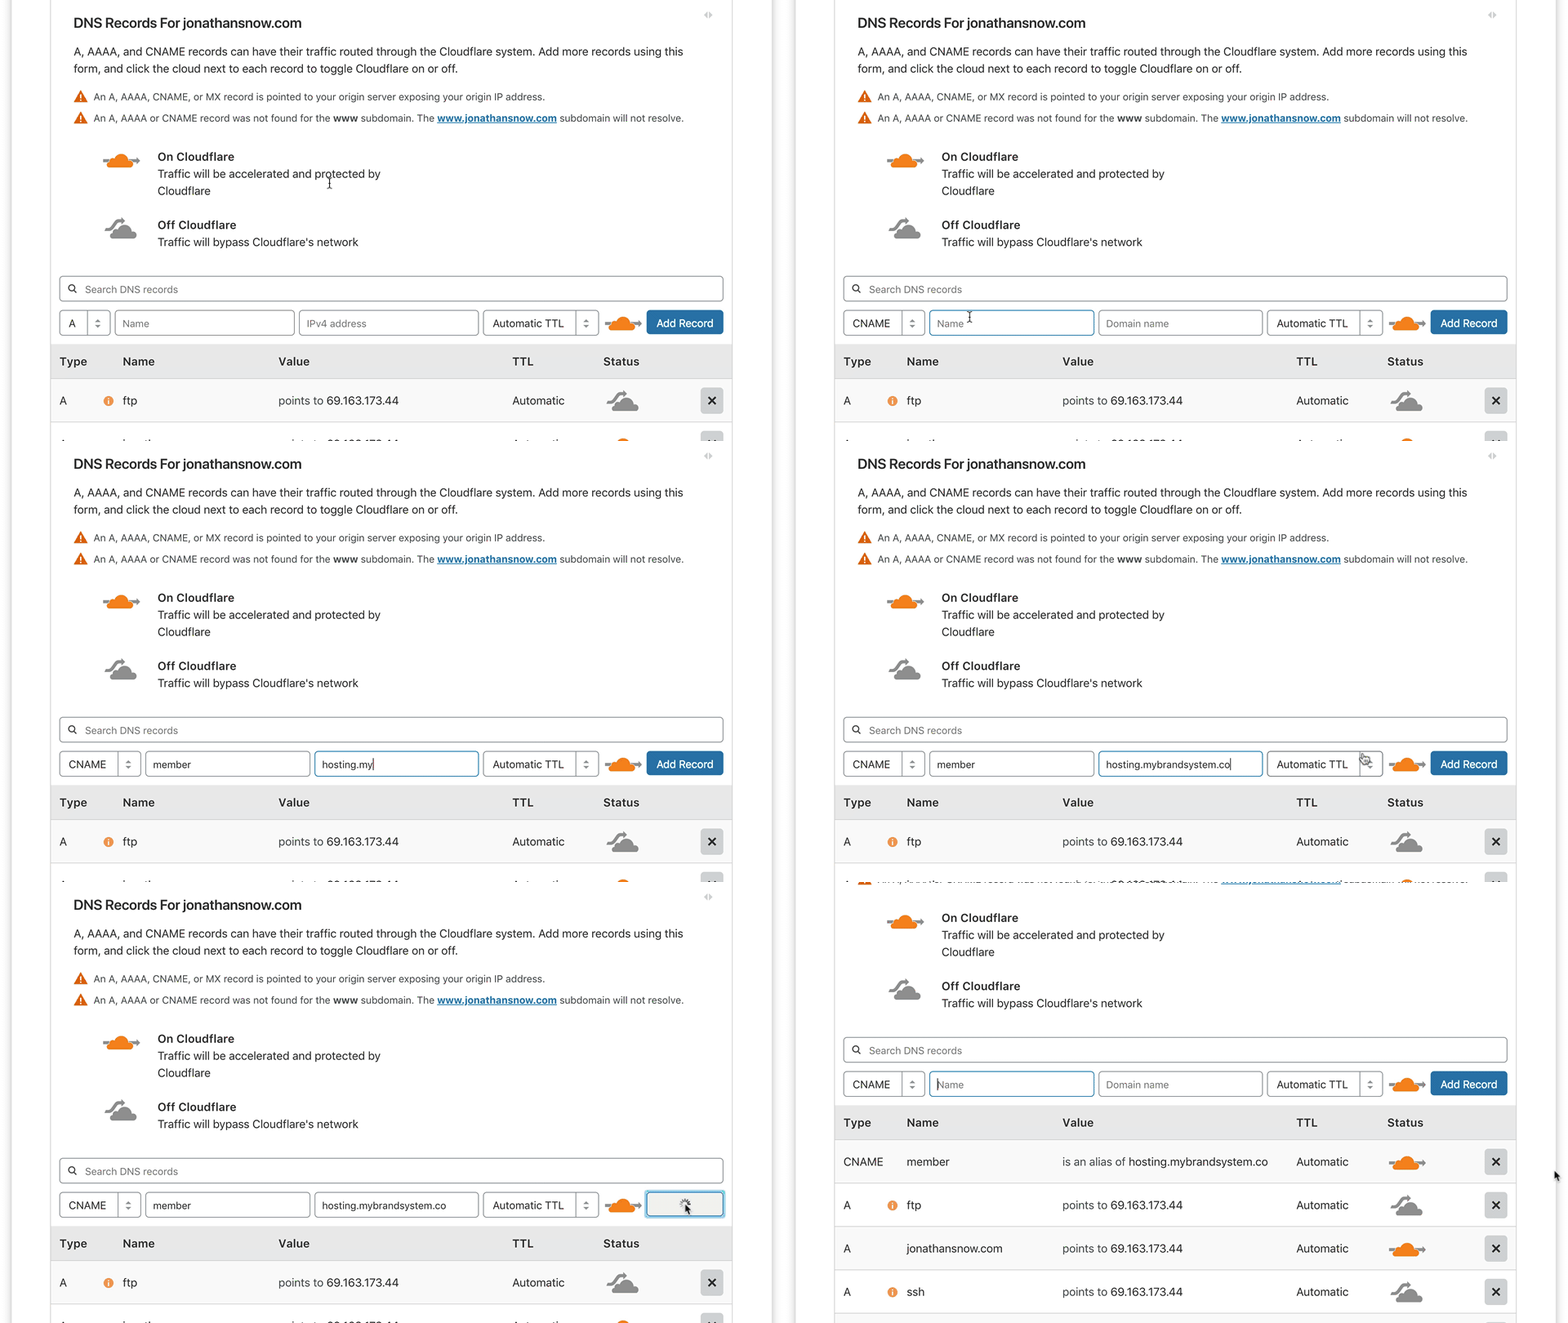
Once you have added your site, Cloudflare will display all of the "DNS Records" it found for your domain. We are going to go ahead and add a new CNAME record to be used with your business center.
-
Simply choose CNAME from the dropdown option.
-
In the field where it requests a 'Name', use the domain you used inside of the business center. You can simply copy it from there:
Essentially, what we are doing here is making Cloudflare your new domain’s DNS (Domain Name System). Any previous entries you had for your DNS like www.yoursite.com, blog.yoursite.com, etc. will now be brought over and managed in Cloudflare. So, what you will want to do next is make sure the DNS entries brought over from Cloudflare are all correct before adding your new Business Center domain (i.e. member.mysite.com).
Once you have added your site, Cloudflare will display all of the "DNS Records" it found for your domain. We are going to go ahead and add a new CNAME record to be used with your business center.
Simply choose CNAME from the dropdown option.
In the field where it requests a 'Name', use the domain you used inside of the business center. You can simply copy it from there:
-
Next, for the 'DOMAIN NAME' field, you will want to enter this exaclty: hosting.mybrandsystem.co
-
Make sure that the "Cloud" icon is orange (if not, just click on it) and then click "Add Record"
Next, for the 'DOMAIN NAME' field, you will want to enter this exaclty: hosting.mybrandsystem.co
Make sure that the "Cloud" icon is orange (if not, just click on it) and then click "Add Record"
-
Now, before you click 'Continue' and move to the next step, you'll want to confirm that Cloudflare DID in fact bring over any existing settings. If this is a new domain, you don't have to worry about that. However, if you are currently using your domain elsewhere as well, just make sure that Cloudflare did find all of your existing records.
-
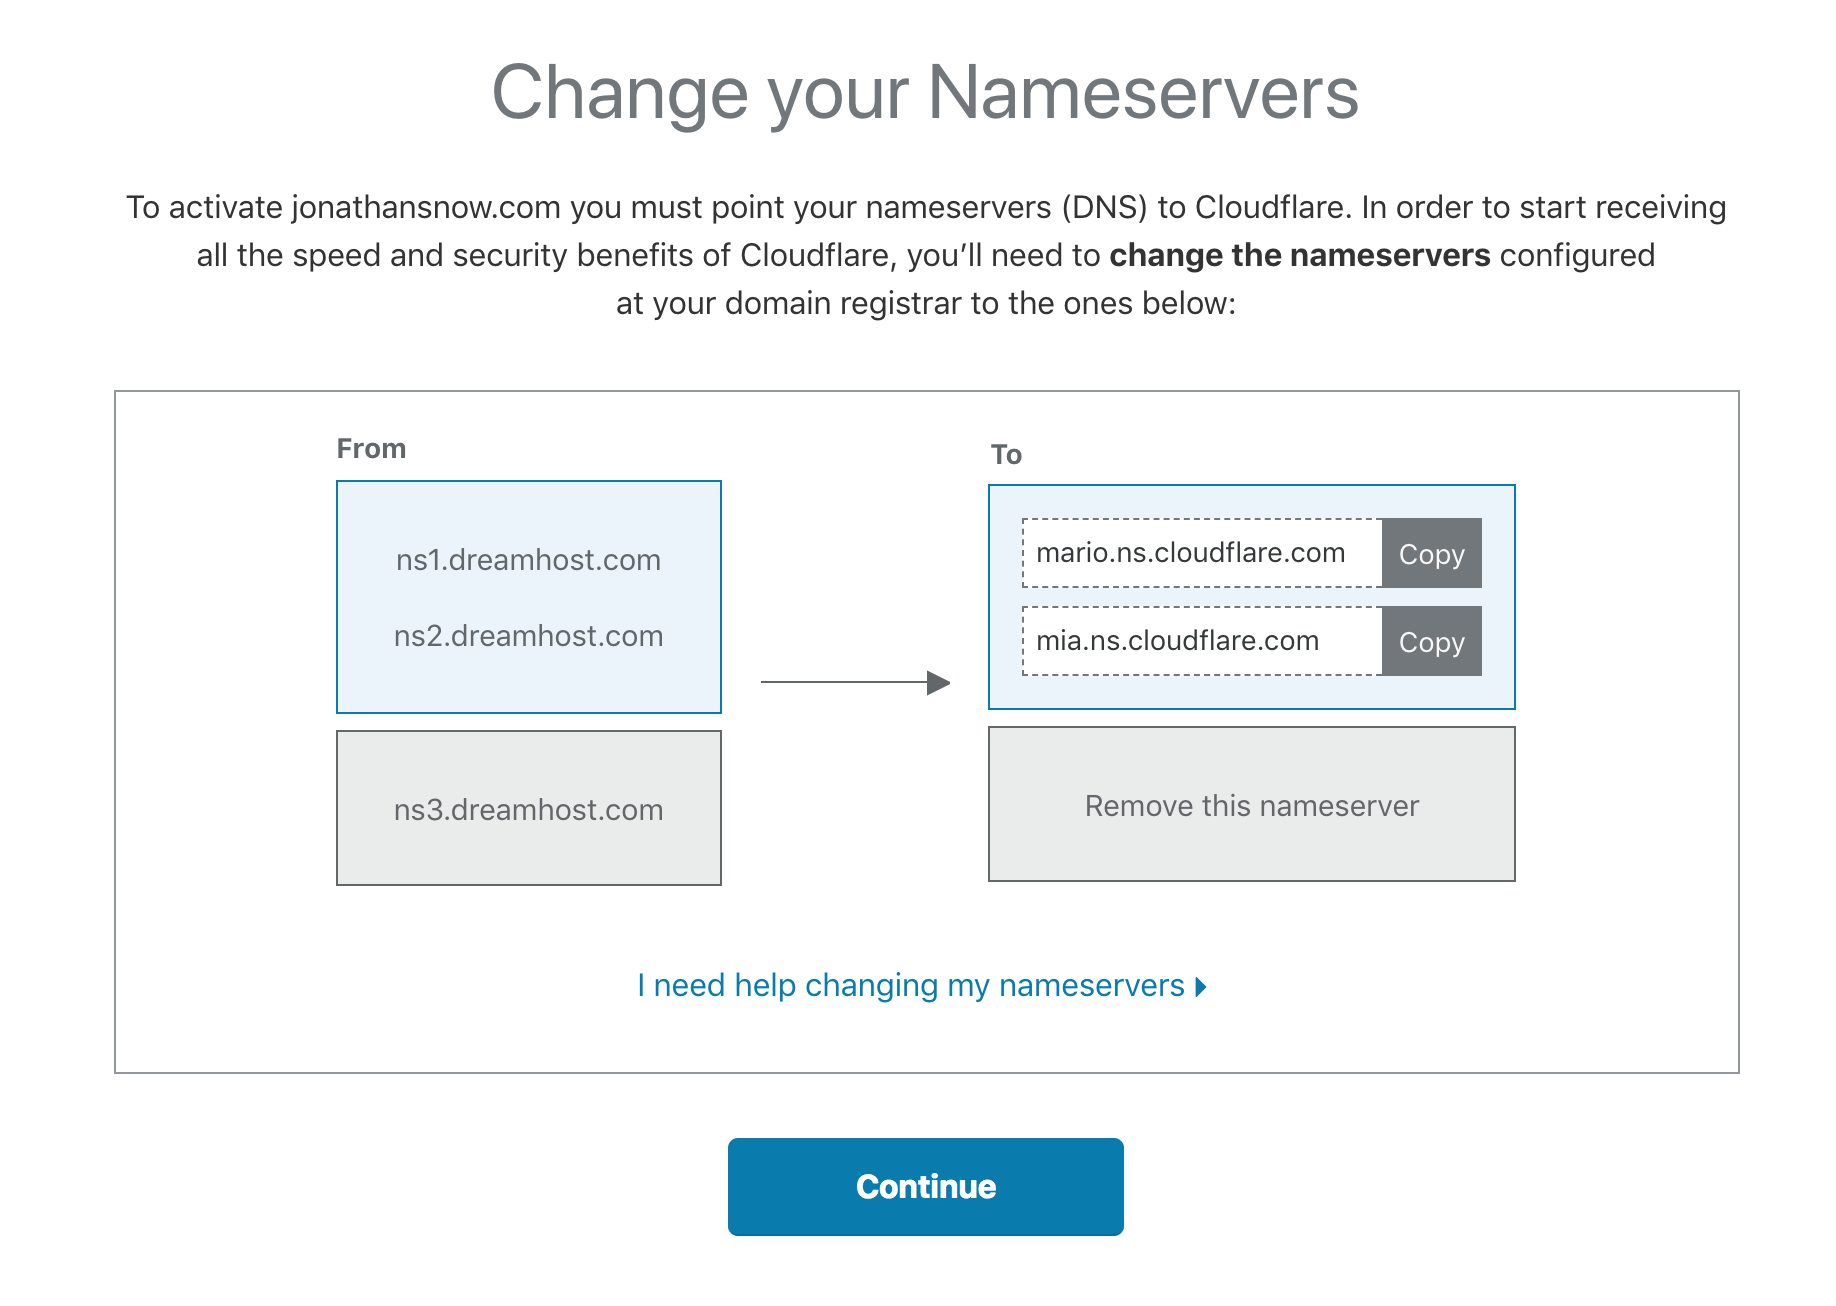
Now it's time to change your nameservers so that we can take advantage of Cloudflare's free SSL services. This next step will differ based on where you registered your domain (for instance, godaddy, google domains, namecheap, etc.).
CloudFlare has many guides for changing nameservers with the most common domain registrars. Find your domain host on the list, then follow the instructions. Please contact your registrar if you have any questions. https://support.cloudflare.com/hc/en-us/articles/206455647
Now, before you click 'Continue' and move to the next step, you'll want to confirm that Cloudflare DID in fact bring over any existing settings. If this is a new domain, you don't have to worry about that. However, if you are currently using your domain elsewhere as well, just make sure that Cloudflare did find all of your existing records.
Now it's time to change your nameservers so that we can take advantage of Cloudflare's free SSL services. This next step will differ based on where you registered your domain (for instance, godaddy, google domains, namecheap, etc.).
CloudFlare has many guides for changing nameservers with the most common domain registrars. Find your domain host on the list, then follow the instructions. Please contact your registrar if you have any questions. https://support.cloudflare.com/hc/en-us/articles/206455647
Finalizing your Domain Setup
Once you have followed the Cloudflare guide for your domain registrar to change your name servers, there are just a couple more steps to do - we need to confirm one setting in Cloudflare, then we need to verify the domain in in the Business Center, and we're done!
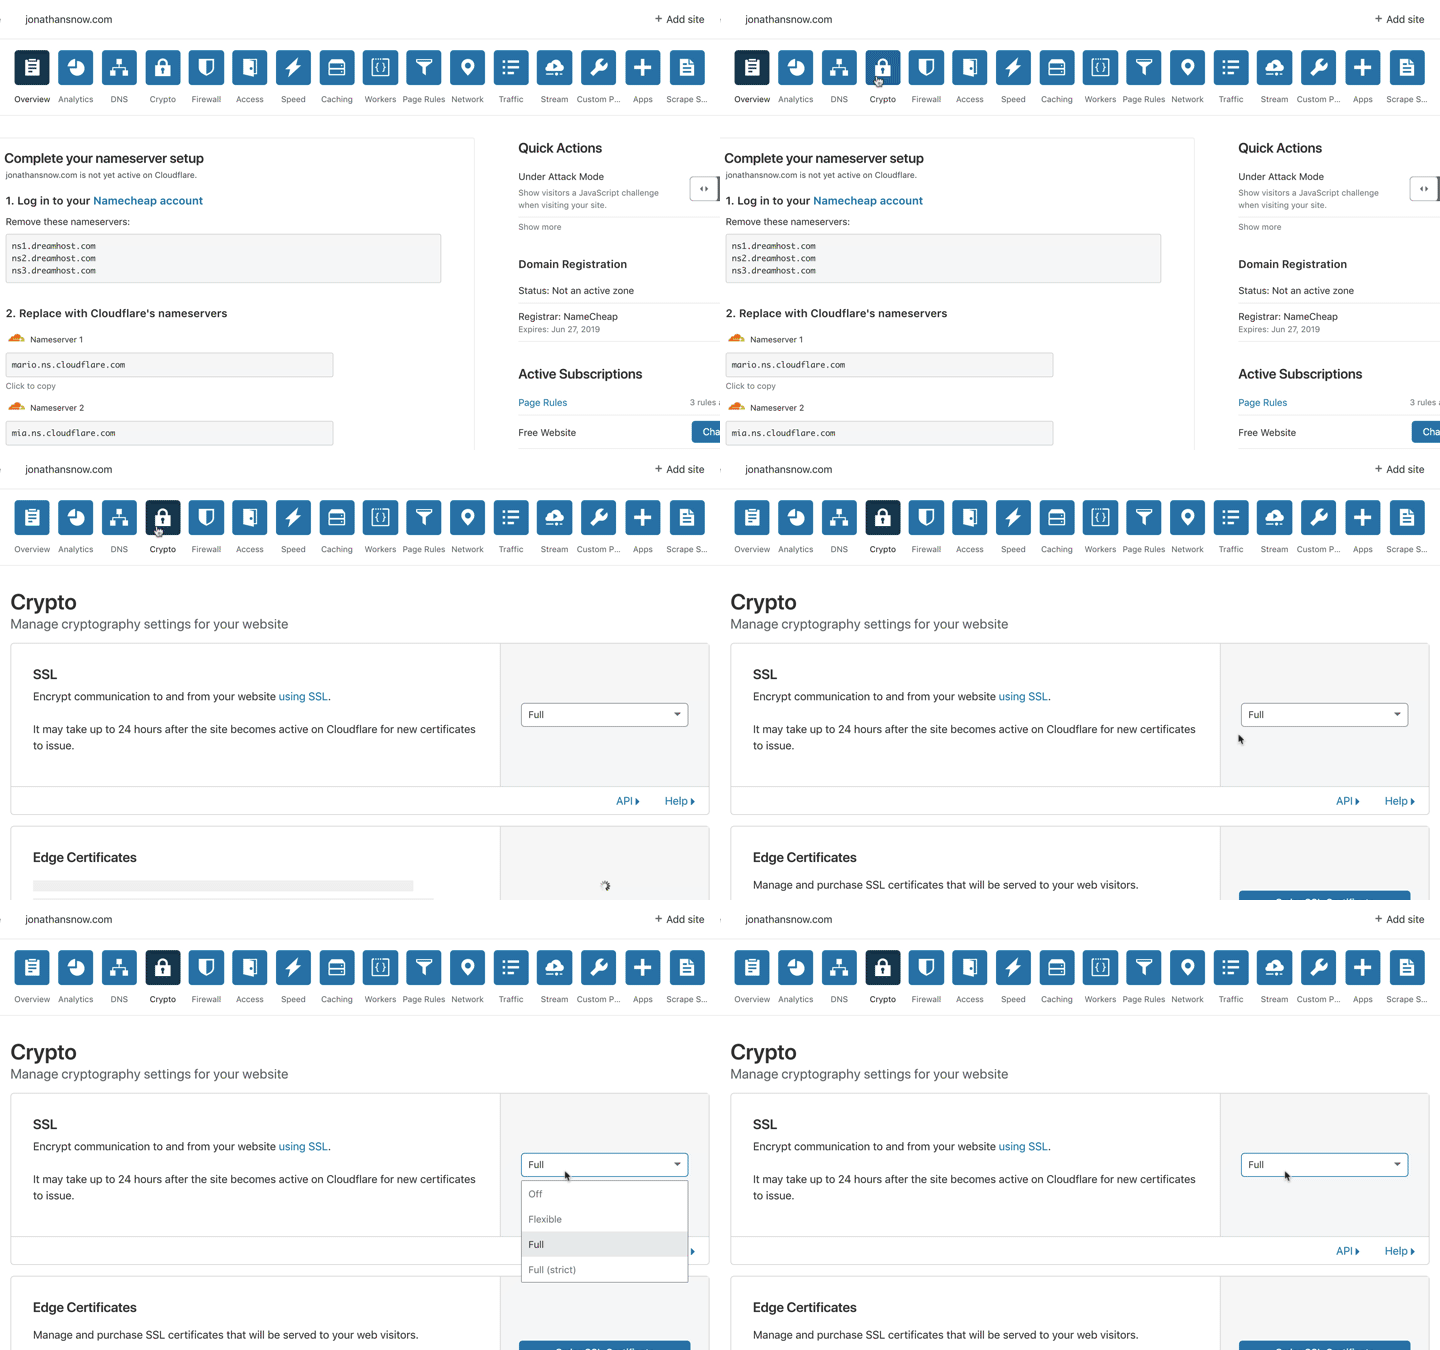
So, now in Cloudflare, navigate to the 'Crypto' tab. We want to make sure that the SSL option is set to FULL
Lastly, we simply need to verify the domain inside the Business Center. Now, we will only be able to verify your domain if you completed all the steps above. Meaning you've set up Cloudflare, added your CNAME record and changed your domain's nameservers. If you have, click the Verify button and you're all set!
