Creating a Checkout Cart so People Can Buy
Checkout funnels are how you will sell the product offers you have created, and they are very simple to create and customize. By default checkout funnels come with a checkout page and a thank you page. We'll get in to adding upsell sequences in another section. Let's create a checkout funnel!
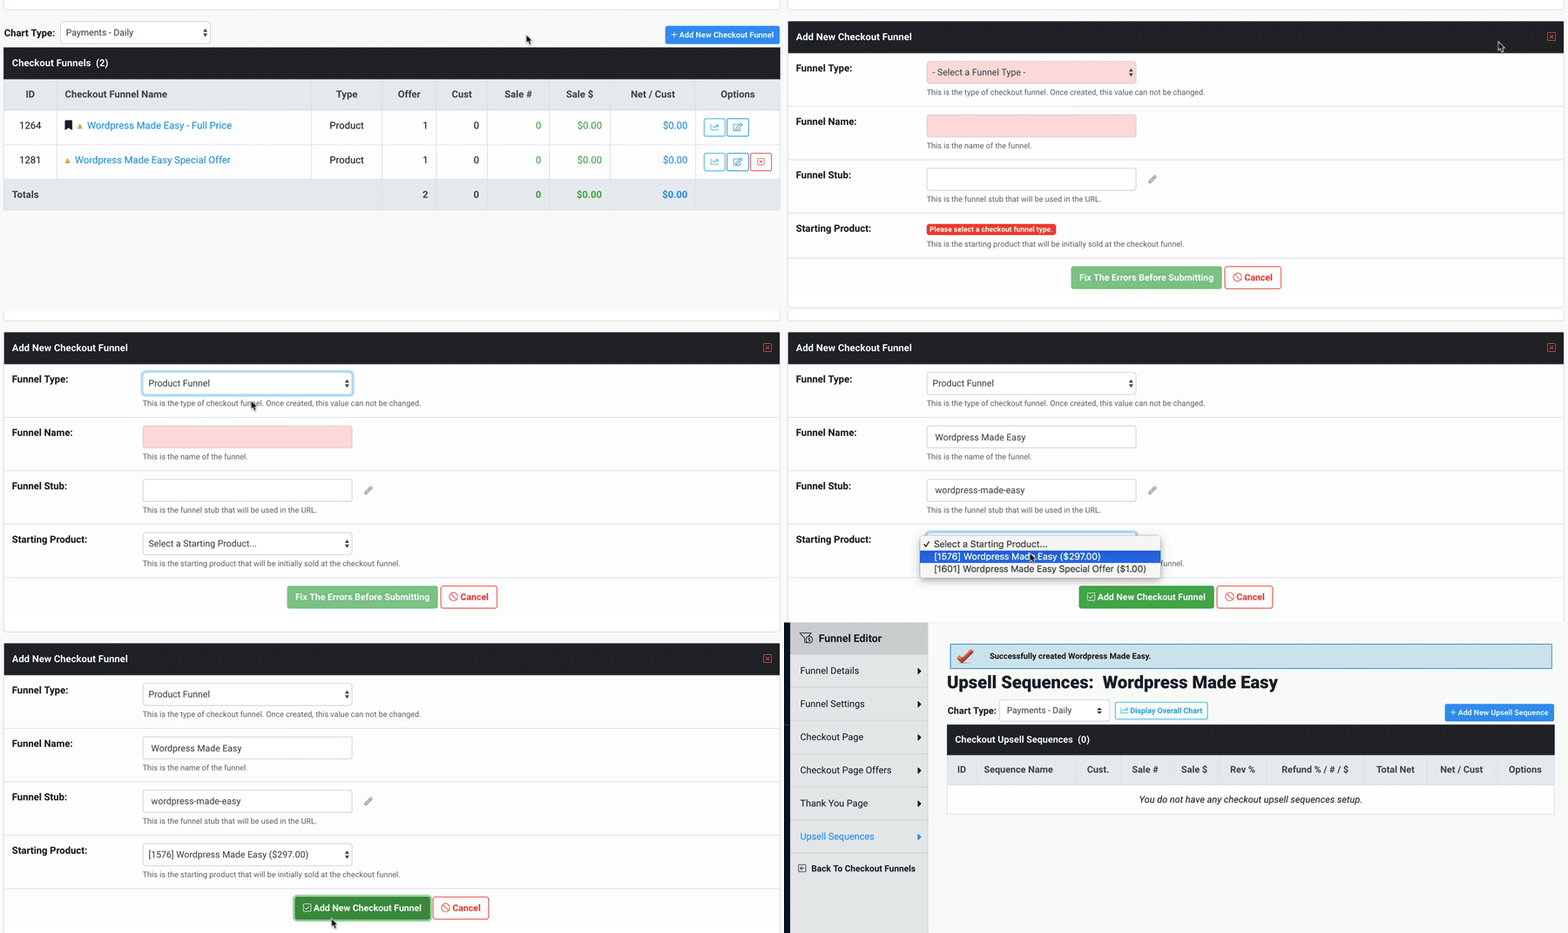
When logged in to your Business Center, navigate to Checkout Manager -> Checkout Funnels, and click on Add New Checkout Funnel.

You will now have some options to create your checkout funnel:
Funnel Type: Select whether you will be selling a regular product or a membership product with this checkout funnel. This choice will determine which product you can use as the 'starting product' as we continue.
Funnel Name: You can give your funnel a name here. While your users will not see the name, they will see the 'funnel stub' below as it will be part of the URL you link to to begin the checkout process
Funnel Stub: This is the funnel stub that will be used in the URL. It will be automatically created for you based on the name but can be edited at anytime until the checkout funnel is published.
Starting Product: When you select the Funnel Type, this dropdown menu will show all of the products you have created that match that funnel type, whether they are regular products or membership products. Select the product that this checkout funnel will be selling.
Finally, click the 'Add New Checkout Funnel' button to complete the process.
Example: Creating a regular product checkout funnel to sell my Wordpress Made Easy product

When you finalize these settings and click the 'Add New Checkout Funnel' button, you will be taken to the funnel editor where the real power kicks in. Lets take a look at the Funnel Editor below
The Funnel Editor Screen
After creating your checkout funnel, you will be brought to the Funnel Editor screen for that funnel. Here is where you will get the checkout funnel link, view analytics and statistics, edit & customize your funnel settings and add upsells to the funnel.
Below we'll go through the Funnel Editor navigation and show you what each one allows you to do.
-
Funnel Details: This is where you will get your checkout funnel link. (This is the link you will send people to when they want to purchase your product.) You will also be able to view the stats and analytics for this particular funnel.
-
Funnel Settings: Edit your funnel settings here. When you are complete with the settings you want for this checkout funnel, this is where you can tick the Publish box and save the checkout funnel to publish it. Once it is published, you will no longer be able to change the funnel stub that will be used in the URL.
-
Checkout Page: This is where you will be able to customize your checkout page settings. Customize the content, add a guarantee, edit the checkout flow and more. Learn more about the checkout page options here.
-
Checkout Page Offers: Order bumps are extremely powerful for increasing the customer value at checkout. It allows someone to check a box and add an offer to their order before finalizing it. This is where you will set that up. Learn more about order bumps and checkout page offers here.
-
Thank You Page: This is where you will edit and customize the content for the thank you page. This is the last page the customer will see in their checkout journey. Learn more about customizing the thank you page here.
-
Upsell Sequences: This is where you will be able to add and customize your upsell sequences for this funnel to control your customers journey through the checkout process. To learn more about upsell offers and sequences click here.
Funnel Details: This is where you will get your checkout funnel link. (This is the link you will send people to when they want to purchase your product.) You will also be able to view the stats and analytics for this particular funnel.
Funnel Settings: Edit your funnel settings here. When you are complete with the settings you want for this checkout funnel, this is where you can tick the Publish box and save the checkout funnel to publish it. Once it is published, you will no longer be able to change the funnel stub that will be used in the URL.
Checkout Page: This is where you will be able to customize your checkout page settings. Customize the content, add a guarantee, edit the checkout flow and more. Learn more about the checkout page options here.
Checkout Page Offers: Order bumps are extremely powerful for increasing the customer value at checkout. It allows someone to check a box and add an offer to their order before finalizing it. This is where you will set that up. Learn more about order bumps and checkout page offers here.
Thank You Page: This is where you will edit and customize the content for the thank you page. This is the last page the customer will see in their checkout journey. Learn more about customizing the thank you page here.
Upsell Sequences: This is where you will be able to add and customize your upsell sequences for this funnel to control your customers journey through the checkout process. To learn more about upsell offers and sequences click here.
How to Use Your Checkout Funnel
Once you have created your checkout funnel, you are ready to start spreading the word and getting customers to buy your product.
To do that, you simply need to link them to the start of your checkout funnel. This link can be found in the Funnel Editor under 'Funnel Details,' as seen below:
 Did this answer your question?😞😐😃